AngularJS unit testing
AngularJS ships with Protractor, which purports to make integrated, or end-to-end testing easy.
I found this to not quite be the case; at one point, I was contemplating giving up on integrated testing completely, but I’ve found a set of patterns that makes AngularJS E2E testing a lot more robust; and subsequently, I feel more confident that the tests are doing what they’re supposed to.
This post is written as a “Dummies Guide”, so if you’re intimately familiar with concepts such as Page Objects, State Objects and Protractor in general, then I won’t be offended if you quietly move on without reading further, or even better offer your ideas on how this approach can be improved.
The testing pattern that I’ll describe in the coming sections makes use of the following concepts / patterns:
- Page Objects - Little scripts that talk to the underlying UI driver (i.e. Protractor) and export those interactions as more intuitive concepts (e.g.
ClickLoginButton) - State Objects - Scripts that encapsulate everything about a user-defined state.
- Composition - Building up objects from simpler objects
Using these three ideas in concert, I’ve found that tests are
- easier to write.
- easier to maintain.
- easier to read.
- Actually testing what I intended them to test.
Page Objects
There are plenty of good references on what Page Objects are, so this is a dumbed-down summary of these references:
Let’s say you want to send a command to click the login button on your Navigation bar. The code might look like this:
$('#login').click()
Pretty straightforward, yeah? But let’s say you have half a dozen scenarios that click the login button. You will repeat that expression half a dozen times.
Then in 6 months, you refactor your UI and the id tag for the login button becomes topnav-login. Now you need to change your test code in 6 different places.
And what about the code that checks that the login button is visible?
expect($('#login').isDiplayed()).toBe(true)
Forgot about that, didn’t you? Long story short, you spend half a day fixing your tests because of a few refactorings in the HTML.
This is what Martin Fowler and others mean when they say UI tests are “brittle”. UIs tend to change a lot, and the tests that rely on them break very easily.
Page Objects alleviate some of these problems. Here are some rules that I found make for robust tests.
How to define a Page Object
There are different ways of defining Page Object (POs) but I found that defining each PO as a JavaScript class works best for me. A factory function would probably work just as well.
First, reference UI widgets of interest in the PO’s constructor. Then, actions that make use of those elements are defined as prototype functions. e.g.
function TopNavBar() {
    //All widget references are defined in the Constructor
    this.login_btn = $('#login');
}

//Action methods are defined as prototype functions
TopNavBar.protoype.clickLogin = function() {
    this.login_btn.click();
}
Each logical component is a separate Page Object.
When UIs change, there’s only one place to fix those UI references.
How much of the UI should be captured in one PO? That’s up to you, but it makes sense to keep logical parts of the UI (nav bar, forms, login page) as separate POs. If the PO for a single element (let’s say a long MyAccount page) is getting too large, it might me more manageable to break it up into smaller POs.
If the same visual element, or widget appears in more than one place, then you definitely want to pull that out into its own PO.
It’s easy to build up complex POs from simpler ones - but I tend to do that in the State Objects (see below).
Any and all interactions with the UI are coded in the Page Object
Your tests (and State Objects) should never reference the WebDriver or Protractor UI directly. All interactions in these objects are expressed at a logical level, so write
    TopNavBar.ClickLoginButton();
    expect(TopNavBar.isLoginButtonVisible()).toBe(false);
rather than a partial implementation
    TopNavBar.ClickLoginButton();
    //Avoid this:
    expect(TopNavBar.login_btn.isDisplayed()).toBe(false);
Why do this?
- Again, all UI interactions are kept in one place. So changes to Protractor (or if you decide to change testing environment in the future) mean you only have to edit one file; and in theory your tests don’t have to be touched.
- You’ll often find that what starts out as a simple one-liner (
..isDisplayed()) can end up being more tricky when you discover that you have to wait for animations, do some other checks and so on. The logical concept of having the login button hidden can be encapsulated in the page object along with all the other details and tricks you need to pummel Protractor with to capture the User concept of “The login button is hidden”.
Code-reuse is encouraged
If your POs capture the elements and behaviour of logical on-screen sections, and these sections are reused in different parts of your web app (e.g. the nav bar), or (as is almost always the case) elements are used in more than one test, then one PO can be referenced multiple times – code re-use!
In the first instance, you can see the benefits of not having to repeat yourself:
    function LandingPage() {
        this.navbar = new TopNavBar();
        this.dashboard = new DashBoard();
        ...
    }

    function AccountPage() {
        this.navbar = new TopNavBar();
        this.profile = new ProfileSection();
        ...
    }
In the second instance, the single (well-written) TopNavBar page object can be
used in multiple places
    expect(myLandingPage.navbar.isLoginButtonVisible()).toBe(true);
    ...
    expect(myAccountPage.navbar.isLoginButtonVisible()).toBe(false);
State Objects
Page Objects play a key role in abstracting away the low-lvel UI driving stuff, but I still found my integration tests to be quite brittle and a pain-in-the-ass to read and maintain. Then I came across this article on State Objects and suddenly everything fell into place.
The article is pretty accessible, and goes into great detail, so I’ll summarise the key points of that article, and highlight some twists to their approach that I have found useful.
State Transition Networks
The idea of a State Object is one that describes the uh, state of your interface in a given situation, as well as the allowable transitions that will trigger a state change.
To see the State Object in action, it’s best to look at a State-Transition-Network diagram such as The one in Figure 1 below:
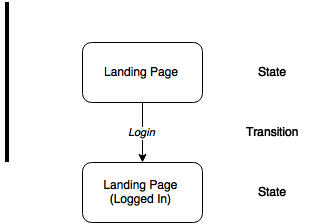
In this example, when you first load up the website, you’re at the landing page. You might expect the following statements to hold:
- The landing page is present
- The background is grey
- The login button in the nav bar is visible
From here, the user can click the Log in button, which puts her in the Logged in state where the following statements must hold:
- The landing page is present
- The landing page has a nice red border
- The login button is hidden
- The logout button is visible.
From here, clicking the logout button will put the user back into the Landing Page state.
In this simple example, the State-Transition-Network (STN) has two states - The landing page and the landing page after logging in. In addition, to move between the states we have two transitions called login and logout respectively.
A full-blown application will have more complicated STNs, but because SOs are so modular, you’ll find that the method scales out in a straightforward manner, and that even this simple example is pretty general.
There are a few more “special cases” outlined in the original paper on State Objects, but besides the conditional triggers, these are really just notational sugar on the same simple idea. And conditional triggers are methods that apply some logic to decide which state one ends in.
What makes the State Object approach so neat is that I described the states in natural language, but it’s really straightforward to translate this into code.
To manage this, each state object does two things
- It has a
selfCheckmethod (referred to as an inspection method) that uses assertions to test the statements that describe the state. - It has a set of methods that transition from the current state to another state (referred to as trigger methods).
- An entry point into the STN from outside (e.g. hitting the page from the base URL) is generally implemented in a method called
get.
Each scenario in the integration test suite then does little more than trace a path through a set of states, calling the selfCheck method on each one to ensure that we are indeed in the state as defined in the SO.
What’s also cool is that you won’t be able to go from two unrelated states in the Network because the required trigger method won’t exist in the source state object.
The cited article presents State Objects as a general form of Page Object. However, I see them as completely distinct, and serving two different purposes. State objects are another layer of abstraction above the UI and therefore all the benefits of using POs (rather than manipulating the UI from E2E tests directly) apply equally to State Objects.
You’ll see in the code below how maintaining both POs and SOs make for really elegant tests. Firstly, let’s have a quick look at how the E2E/integration test folder might look in this instance:
    |
    |- page_objects
    |   |- TopNavBar.po.js
    |   |- LandingPage.po.js
    |
    |- state_objects
    |   |- LandingPageState.js
    |   |- LoggedInState.js
    |- loginSpec.js
Writing State Objects
Let’s look at how the Landing Page state object code might look.
Compose SOs with POs
First of all, our Landing Page consists of the Nav Bar as well as the main page. So first we create instances of the relevant Page Objects:
	//Create a model of the UI using Page Objects
	function LandingPageState() {
	   this.topNav = require('../pageObjects/topNavBar.po.js');
	   this.main = require('../pageObjects/dashBoard.po.js');
	}
Since the Landing Page State is an entry point into the STN, we also define a get method that launches the initial state.
	//This State Object has an entry point, so we define a GET method
	LandingPageState.prototype.get = function() {
		//This is a little naughty. I should really have a homepage.po.js file that defines a loadPage method.
		//because UI interactions should live in POs, but I'll break my own rules in the interest of brevity.
		return browser.get('/', 1000);
	};
We then define the transition methods that are available from this state. In this example, there is just one: Log in.
	//This is a trigger method to another state
	LandingPageState.prototype.login = function() {
		return topNavBar.loginBtn.click();
	};
Then, we write the assertions that test that the current state is the desired state. This is done in the selfCheck method. Notice that by employing Page Objects, the code is very similar to the natural language check list we wrote above.
	//All State Object should have this method that tests whether we are in fact in the desired state
	LandingPageState.prototype.selfCheck = function() {
		var self = this;
		browser.sleep(1000).then(function() {
			//Note: Jasmine automatically resolves promises, so even though topNav.getXXXX returns a promise, you can
			//put in an expectation on the resolved value.
			expect(self.topNav.isLoginLinkVisible()).toBe(true);
			expect(self.topNav.isLogoutLinkVisible()).toBe(false);
			expect(self.main.isContainerVisible()).toBe(true);
            expect(self.main.containerColor()).toBe(gray);
		});
	};
Ideally, all we need are the three assertions. However, if your AngularJS app makes use of animations, then you need to wait a bit before running the selfCheck assertions. This is where the browser.sleep command comes in handy.
Now, this isn’t 100% bullet-proof, but we can be pretty confident that if we expect to be in the Landing Page state, then the selfCheck method must pass. We’re pretty agnostic about how we got to the state. Whether it was via an external URL, or by logging out, we don’t really care. The state is the state. If you’re at odds with this statement while coding your tests, ask yourself whether you really have the same state in each case. Even in this example, the screen looks very similar after logging in, but there are two distinct states in play. The high degree of overlap is covered by making use of Page Objects to make code repetition minimal.
Finally, export the State Object as a node.js module.
module.exports = new LandingPageState();
Test scenario
The test scenarios now just string a bunch of states together using the trigger methods:
	var landingPageState = require('./state_objects/LandingPageState');
	var loggedInState = require('./states/LoggedInState');

	describe('A user', function() {
		it('Logs in and out', function() {
        landingPageState.get().then(function() {
            landingPageState.selfCheck();
            landingPageState.login().then(function() {
                loggedInState.selfCheck();
                loggedInState.logout().then(function() {
					LandingPageState.selfCheck();
				});
            });
        });
    });
Tips and tricks
- The
browser.sleepcommand is often required to force Angular / Protractor to wait for things to settle before running the self checks. I put this code in theselfCheckmethods right now, but a better way may be to create ahelperMethodsPage Object that wraps and hides the UI stuff for you. - Use composition and Page Objects to keep DRY when writing many slightly different testing scenarios.